CommBiz International Payments: How-to video 

CommBiz International Payments: How-to video 

  • What's this guide for?

    Learn how to navigate CommBiz International Payments, complete single or multiple payments and authorise transactions.

  • Why you’d do this

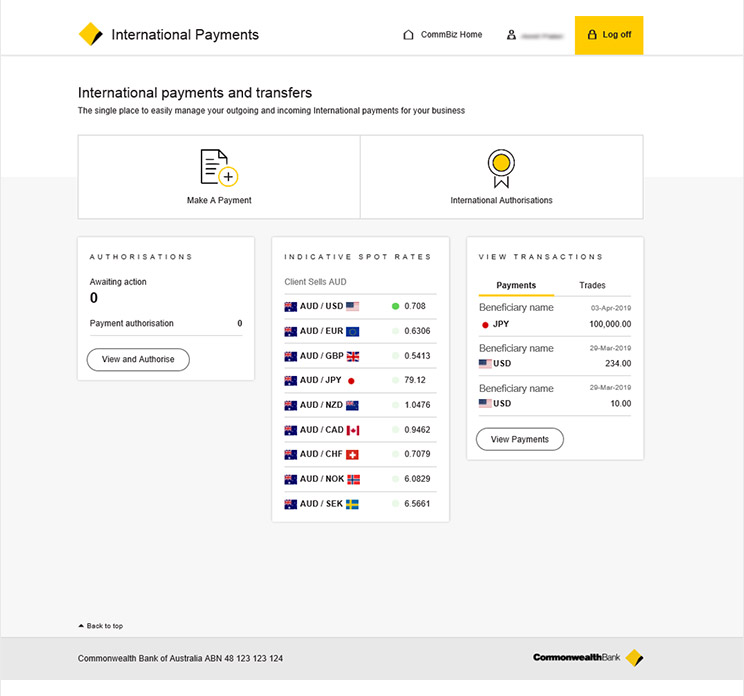
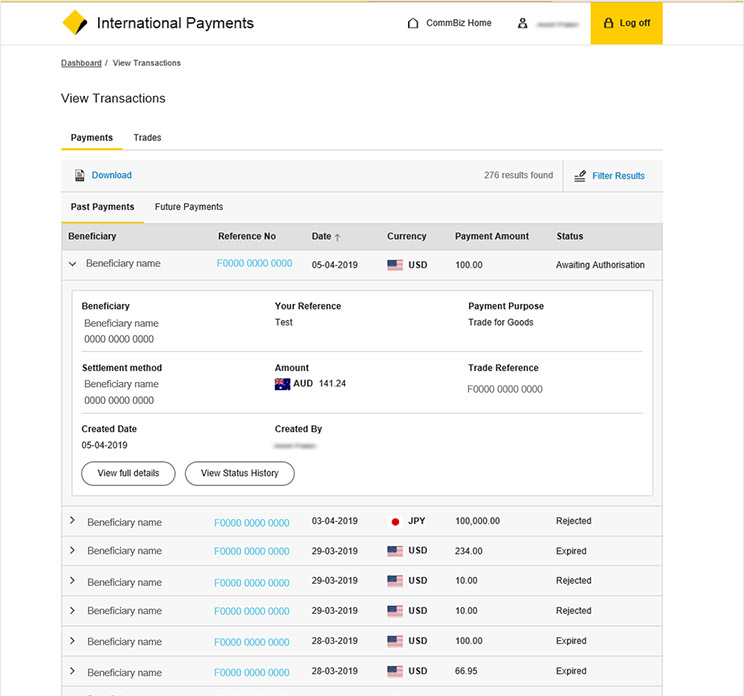
    To make single or multiple payments, authorise payments and view transaction history.

  • What you’ll need

    • Create permission, to create payment from a linked account
    • The details of the beneficiary you'd like to pay

Important information to know, before making international payments

    • Update your email address and mobile number after logging in. You can do this in the Alerts section under the Admin tab
    • The currency selected for your first payment will be the default currency applied to any multiple payments created within the same transaction
    • To protect against market movements, the rate won’t be locked in until the international payment is authorised
    • If you choose to schedule an FX payment, you will not be able to authorise the payment until the scheduled FX payment date
    • For scheduled payments, you will receive a notification on the day to authorise the transaction
    • Intermediary bank details must be saved into the CommBiz Address Book before making a payment

Log in & view your dashboard

  1. Log in using your CommBiz ID & Password
  2. Select the Payables tab
  3. Select International Payments

Your dashboard provides you with an overall view and access to key features such as:

  • Make a payment
  • Check your authorisations
  • Preview foreign exchange rates
  • View recent transactions
Screenshot of the dashboard

International Payments allows you to make both Foreign Exchange and same currency payments.

Make single or multiple payments

    1. On the dashboard, click make a payment
    2. Enter your payment information, such as the transaction purpose, beneficiary and the debit or payment amount and payment purpose
    3. Review any payment details, then click Add
    4. To make multiple payments, click enter another payment and repeat steps 1 to 3, for up to 10 additional payments 
    5. To continue, select the account to debit. This is also known as the settlement method
    6. Choose when you want the payment to occur, either from the first available date or schedule a payment
    7. If you want, select a notification option
    8. Submit your payment

Additional features

  • After successful payment, you can:

    • Download a confirmation of payment
    • View the status history
    • Make another payment

Authorise single or multiple payments in a few easy steps.

Authorise a payment

  1. On the dashboard, click international authorisations
  2. To authorise a payment, click the check box next to the payment you want to authorise, or authorise multiple payments by clicking the select all check box
  3. Enter your login ID, password and the token password, then click authorise

Over the shoulder authorisation

Over the shoulder authorisation is when another authoriser chooses their name from the list, enters their CommBiz ID & password and Token password, to authorise the payment.

  1. Select your name from the authoriser drop down list
  2. Enter your login ID, password and the token password, then click authorise
Authorise screenshot

Search for past and future payments and view status history

View transaction & status history

  1. On the dashboard, click view transactions
  2. To display more payment information, click on the ‘>arrow next to the beneficiary
History screenshot

Scheduled payments

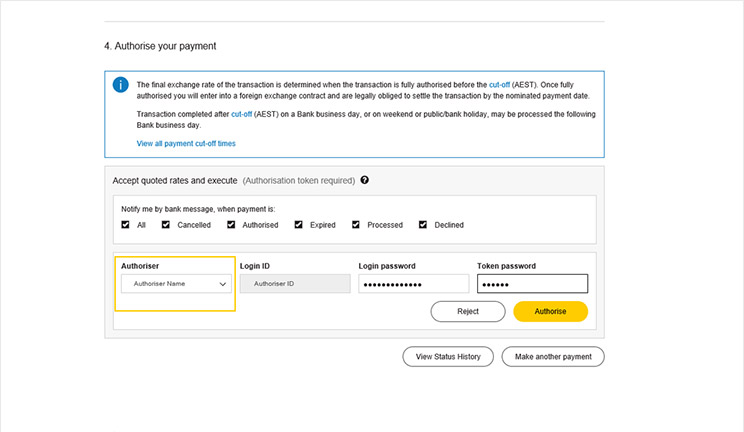
  • Scheduled FX payments need to be authorised on the day of the payment. 

    An optional notification can be sent as a reminder when a scheduled payment is due for authorisation.

    Set up scheduled payment notifications

    1. Exit International Payments to view the CommBiz home screen
    2. Go to the Admin tab and select My Message Preferences
    3. Scroll down to find the heading Messages
    4. Choose how you want to receive your notifications. Select SMS, Bank Message or Email
    5. Scroll down to find the heading Outstanding Authorisation Alerts
    6. There is the option to add the minimum transaction value you want to receive notifications for and above
    7. Another option includes choosing the timeframes you wish to be notified between
    8. Under Payment Types, you may put the minimum transaction value in the International Money Transfer line
    9. You can choose how many hours before cut off you want to receive notifications
    10. Save your changes